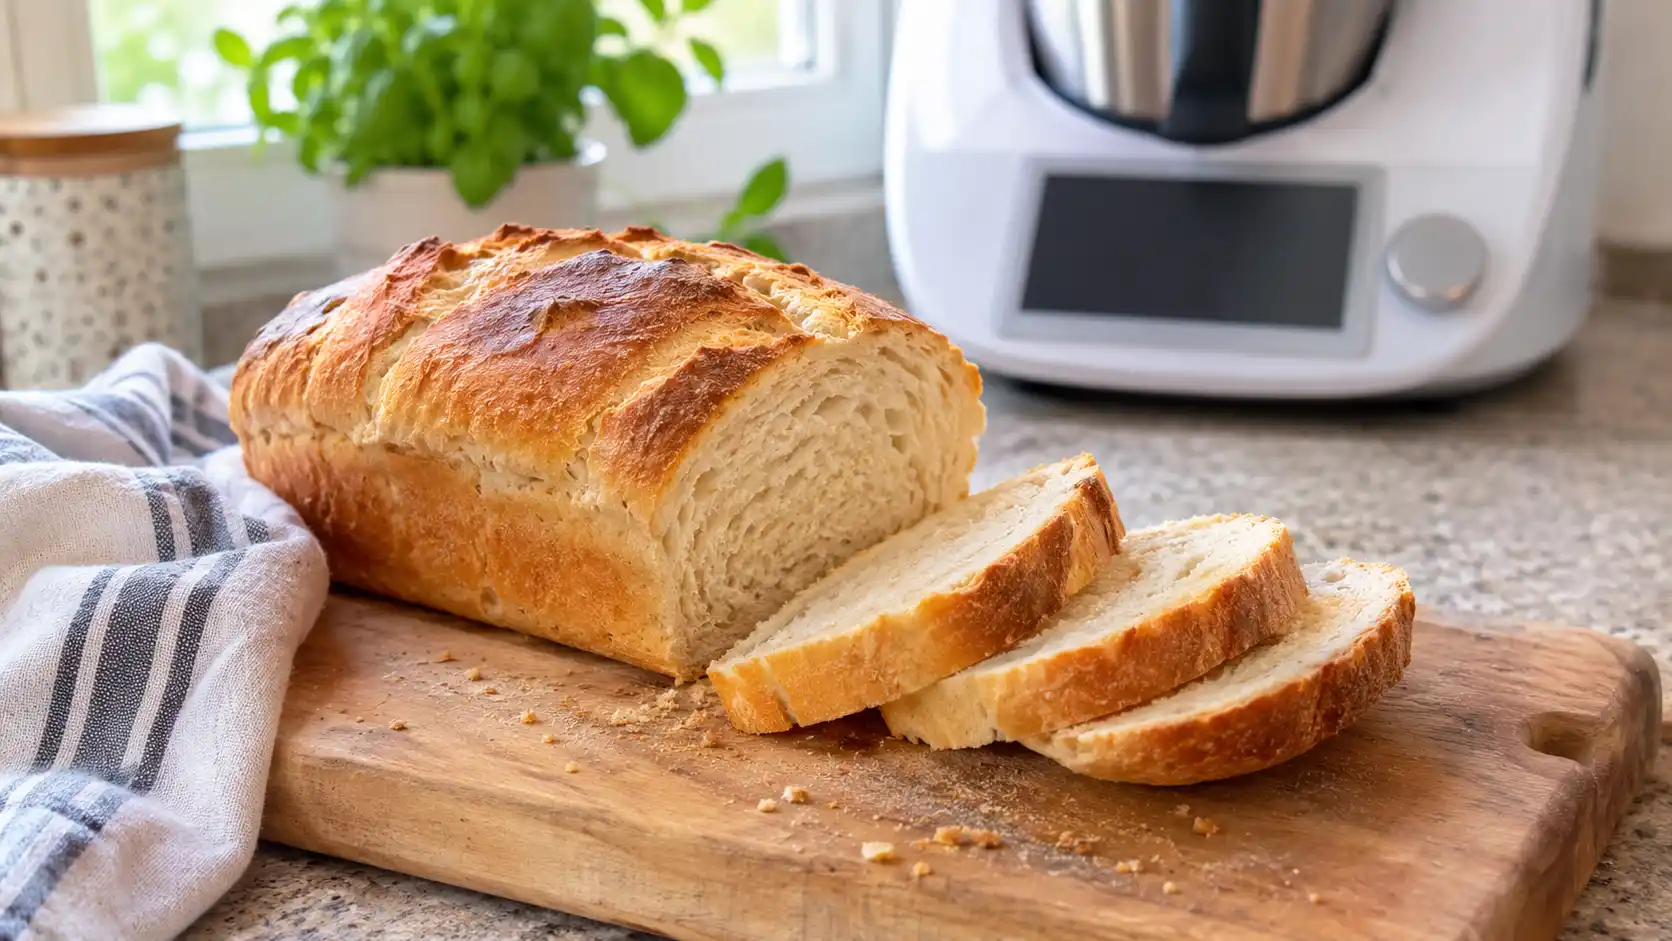
Thermomix bread dough basics are easier to understand when you separate mixing, kneading and proving into three different stages. The Thermomix can weigh ingredients, combine them and develop the dough using its dedicated Dough mode. However, the machine does not bake your loaf, and the proving method depends on your model: you can use a covered container or, on compatible TM6 and TM7 machines, the Fermentation mode. A reliable dough starts with accurately weighed ingredients, suitable hydration and proper gluten development. This guide explains how to recognize the right texture, understand the machine’s settings and troubleshoot dough that becomes sticky, dense or refuses to rise.
Quick Summary
- Can you make bread in a Thermomix? Yes. It mixes and kneads bread dough; you shape and bake the loaf separately.
- What matters most? Accurate ingredient ratios, suitable liquid temperature and sufficient gluten development.
- How do you check the dough? Use the windowpane test for gluten development and the poke test for final proving.
- Why does dough fail? Common causes include unsuitable hydration, inactive yeast, insufficient gluten development and incorrect proving.
Can You Make Bread in a Thermomix, and What Does the Dough Function Do?
Yes, you can make bread dough in a Thermomix without owning a bread machine or stand mixer. Its dedicated Dough or Knead mode combines ingredients and works the dough using an alternating blade movement rather than a conventional dough hook.
The function is designed to imitate aspects of traditional kneading. The TM31 manual describes its alternating operation, while the official TM6 explanation describes clockwise and counter-clockwise blade movements with pauses.
The machine does not automatically turn the dough into a finished loaf. You still need to assess its texture, manage fermentation, shape it and bake it in an oven.
There is also an important difference between kneading and proving. TM6 and TM7 offer Fermentation mode for proofing dough in the Varoma arrangement. Other models can use a separate covered bowl or suitable proving environment.
See the official TM31 instruction manual, Cookidoo’s TM6 Dough Mode explanation and its Fermentation Mode guidance for model-related details.
Thermomix vs Bread Machine vs Stand Mixer
A Thermomix can replace some of the mixing and kneading work performed by other kitchen appliances, but it does not replace every function.
| Feature | Thermomix | Bread machine | Stand mixer |
| Mixes dough | Yes | Yes | Yes |
| Kneads dough | Yes | Yes | Yes, with dough hook |
| Proves dough | Separate or model-dependent Fermentation mode | Usually yes | Separate proving |
| Bakes a loaf | No | Yes, on suitable programs | No |
| Crust and shape control | Oven provides control | Limited by machine pan | Oven provides control |
| Batch capacity | Model and recipe-dependent | Machine-dependent | Bowl and dough-hook dependent |
| Cleaning | Mixing bowl and blade | Pan and kneading paddle | Bowl and dough hook |
Does a Thermomix replace a bread maker?
Not completely. A bread machine can perform the complete process, including proving and baking, using a suitable program. A Thermomix provides more flexibility during mixing and kneading, but you need another proving arrangement when appropriate and an oven for baking.
A stand mixer offers another approach, particularly for larger batches and recipes requiring extended mechanical kneading.
What Goes Into a Basic Thermomix Dough: Ingredients and Ratios
A simple white bread dough requires flour, water, yeast and salt. A small amount of oil is optional when a softer crumb is desired.
A useful starting framework for understanding the proportions is approximately 500 g of bread flour and 300–325 g of water. That gives a hydration range of approximately 60–65%.
Important: This is a foundational ratio example based on the supplied outline, not a Kitchen Memo-tested final recipe. The exact formula needs a controlled baking trial before it can be described as a proven loaf recipe.
Basic Ingredient Framework
| Ingredient | Metric quantity | Approximate US measure | Main purpose |
| Bread flour | 500 g | About 4 cups | Gluten structure and loaf volume |
| Water | 300–325 g | 1¼–1⅓ cups | Hydration and dough development |
| Instant dried yeast | 7 g | About 2¼ tsp | Fermentation and rise |
| Salt | 8–10 g | Approximately 1⅓–1¾ tsp | Flavor and fermentation regulation |
| Olive oil | 10–15 g, optional | 2–3 tsp | Softer dough and crumb |
Use weight measurements wherever possible. Cup measurements vary with flour type and how firmly the flour is packed.
What each ingredient does
- Flour: Bread flour generally provides a stronger gluten structure than ordinary plain flour. This helps the dough retain gas during fermentation.
- Water: Hydrates the flour and allows gluten-forming proteins to develop.
- Yeast: Produces carbon dioxide during fermentation, helping the dough expand.
- Salt: Adds flavor and regulates yeast activity. It also contributes to dough structure.
- Fat: Oil or butter can soften the crumb and change the dough’s handling characteristics, but it is not essential in a basic lean bread dough.
Wholemeal flour also changes the way dough behaves. Its bran and other grain components influence hydration and gluten development.
For a deeper explanation of using spelt rather than conventional wheat flour, see Kitchen Memo’s Spelt Bread: Benefits, Recipes and How to Make It at Home.
How Sticky Should It Feel? Hydration Comparison
One of the most confusing parts of making bread is deciding whether the dough is too wet.
A properly hydrated dough does not always feel completely dry. Some tackiness is normal, particularly with medium- and high-hydration doughs.
The following comparison describes general bread-making tendencies rather than measured Kitchen Memo test results.
| Hydration | General dough feel | Handling | Expected crumb tendency |
| Lower: 55–58% | Firm and relatively dry | Easier to handle and shape | Tighter, potentially denser |
| Medium: 60–65% | Soft and slightly tacky | Manageable with lightly oiled or floured hands | Balanced, moderately open |
| Higher: 70%+ | Wet, elastic and noticeably sticky | Requires careful handling and shaping | Can produce a more open structure with suitable gluten development |
Hydration alone does not determine the final crumb. Flour strength, fermentation, shaping and baking all influence the finished bread.
A useful rule: Do not automatically add flour whenever Thermomix bread dough feels sticky. Allow the flour to absorb the water and assess the consistency again before changing the formula.
The planned three-level hydration comparison, including photographs of dough texture and finished loaves, has not yet been supplied. Therefore, no particular hydration level can be declared the Kitchen Memo winner.
Why Results Differ: The Warm-Up, Mixing Order and Knead Time
Three important factors influence how consistently Thermomix bread dough develops: ingredient temperature, mixing order and kneading.
1. The 37°C Warm-Up
Many Thermomix bread recipes use approximately 37°C (99°F) when gently warming water or combining liquid with yeast.
This temperature can provide a warm starting environment, but it is not essential for every yeast dough. Instant yeast can generally be incorporated directly into the flour, while other yeast preparations may call for dissolving the yeast in liquid first.
The important distinction is between warm liquid and excessively hot liquid. High temperatures can damage or kill yeast. An educational guide from Understanding Ingredients for the Canadian Baker: Using Yeast explains how yeast activity changes with temperature.
Do not confuse the Thermomix’s 37°C setting with the temperature required for proving. Dough fermentation depends on the overall dough temperature and surrounding conditions.
2. Mixing Order
For the basic method in this guide:
- Weigh the liquid and yeast.
- Combine them gently if the selected yeast preparation calls for it.
- Add flour and salt in the order specified by the recipe.
- Incorporate optional fat where appropriate.
- Knead using the compatible Dough mode.
Adding liquid first can help wet and distribute the flour more evenly when following a liquid-first recipe.
Instant yeast does not need to be activated separately in every recipe. Follow the instructions for the yeast type you are using.
3. Knead Time
Knead duration is not identical across every Thermomix model or bread formula.
For example, Cookidoo explains that two minutes of TM6 Dough mode performs the equivalent of approximately ten minutes of traditional hand kneading. That is a manufacturer comparison, not a universal timing instruction for every machine or recipe.
Kneading requirements also change with flour strength, hydration, fat content and fermentation method.
The planned 3-, 5- and 7-minute Kitchen Memo kneading comparison has not yet been performed. There are therefore no verified windowpane results or finished-crumb photographs to support a winner.
| Knead duration | Windowpane result | Crumb result | Verdict |
| 3 minutes | Not recorded in a controlled Kitchen Memo test | Not recorded | No tested conclusion |
| 5 minutes | Not recorded in a controlled Kitchen Memo test | Not recorded | No tested conclusion |
| 7 minutes | Not recorded in a controlled Kitchen Memo test | Not recorded | No tested conclusion |
Instead of treating one time as correct for every recipe, assess the dough’s development and follow the appropriate model-specific instructions.
Why Is My Thermomix Dough Sticky, Dense or Not Rising?
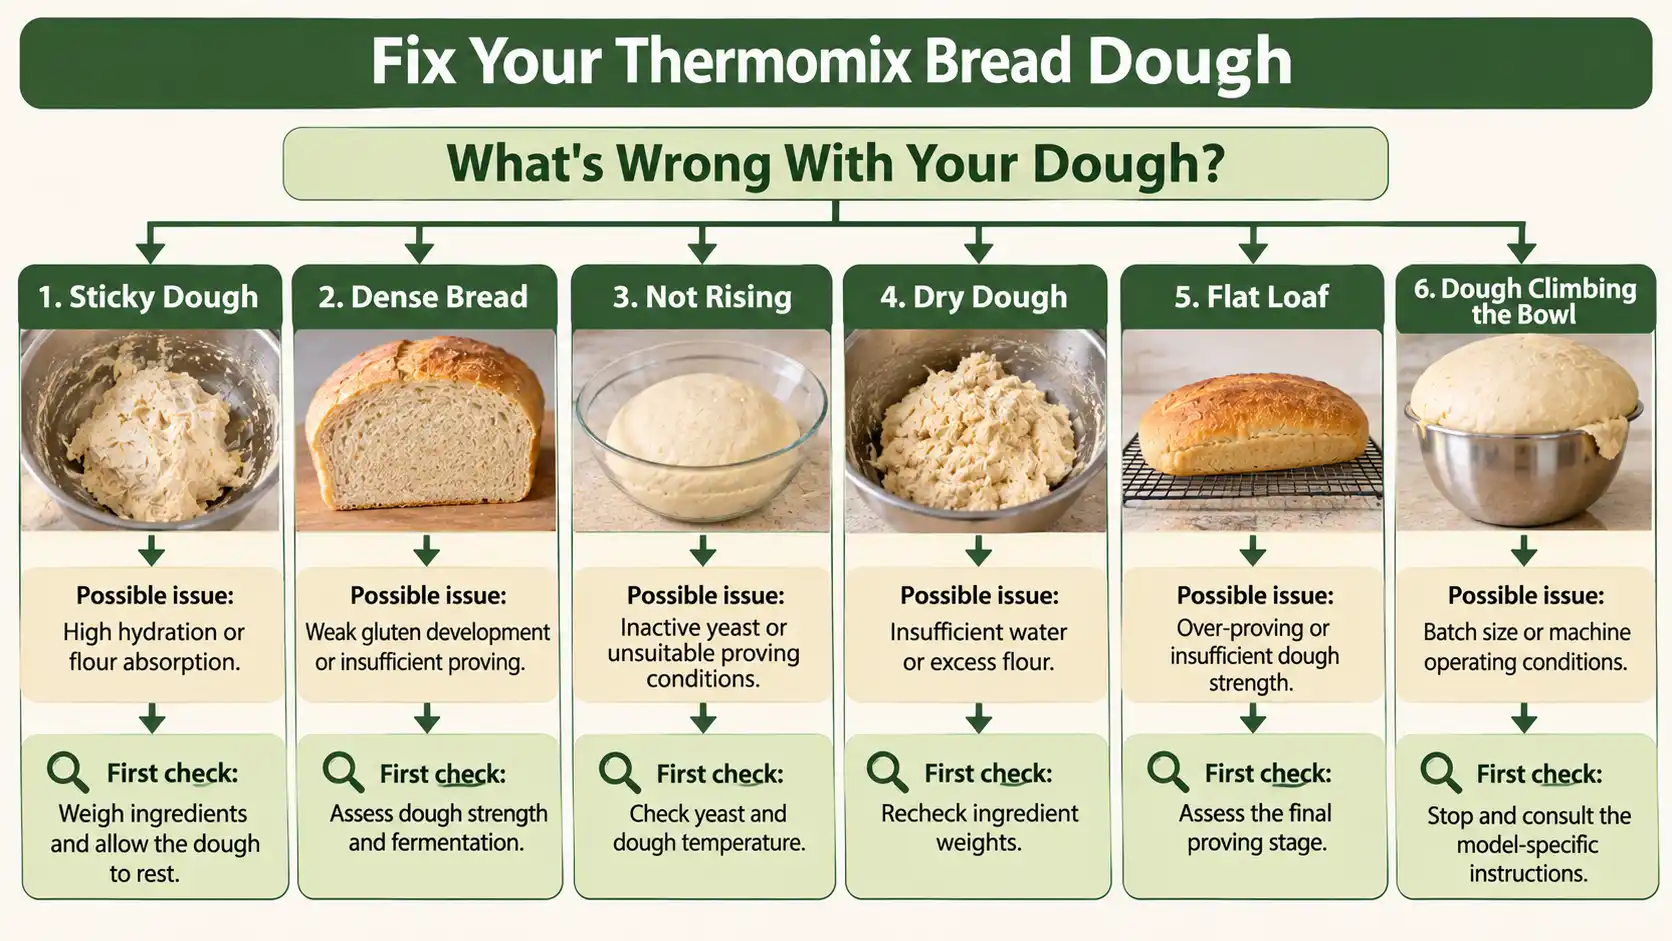
When bread dough fails, the problem is not necessarily the Thermomix itself. Ingredient proportions, flour characteristics, yeast condition and fermentation can all influence the result.
The following troubleshooting guide separates common symptoms from possible causes and practical corrections.
| Symptom | Possible cause | Practical fix | Prevention |
| Sticky dough | High hydration, flour with different absorption or insufficient resting | Allow time for hydration and reassess before adding flour | Weigh ingredients and use consistent flour |
| Dense loaf | Inadequate gluten development, under-proving or excess flour | Check the dough structure and give it sufficient proving time | Avoid adding unnecessary flour |
| Dough not rising | Inactive yeast, unsuitable liquid temperature or a cold environment | Check yeast condition and move the dough to a suitable proving environment | Store yeast correctly and check its expiry |
| Dry or tight dough | Insufficient water or excess flour | Reassess hydration and correct gradually if the formula permits | Weigh flour rather than relying on cups |
| Flat loaf after baking | Over-proving, weak dough structure or unsuitable hydration | Check the final proof and shaping method | Use the poke test and maintain a consistent process |
| Dough climbing the bowl or feeling unusually warm | Excessive batch size, unusually warm dough or unsuitable kneading duration | Stop the process and check the batch against the model’s instructions | Use appropriate quantities and do not experiment beyond model limits |
Sticky Dough
Sticky bread dough is not automatically a failure.
A medium-hydration dough can feel tacky while still having enough strength to form a good loaf.
Give the dough time to rest before adding extra flour. If the mixture remains unusually loose, check whether the water and flour weights match the recipe.
Dense Bread
A dense loaf can result from several problems:
- The dough did not develop enough structure.
- The first or final proof was insufficient.
- Too much flour made the dough excessively stiff.
- The yeast did not produce enough fermentation.
A dense loaf should not automatically be blamed on insufficient kneading. Proving and hydration are equally important parts of the process.
Dough Not Rising
First check the yeast. Old or improperly stored yeast may have reduced activity.
Then consider the surrounding temperature. Dough rises more slowly in a cool environment and more quickly in warm conditions.
Avoid increasing the yeast quantity immediately. Identify the actual problem before changing the formula.
Flat Bread
A loaf that expands and then collapses may have been over-proved or may lack enough structure to hold its expanded shape.
Check the dough before baking rather than relying solely on a timer.
Dough Climbing the Bowl or Feeling Hot
Check the batch size and the machine’s operating instructions. If the dough behaves unusually, stop the cycle rather than continuing indefinitely.
Vorwerk specifically advises against leaving an experimental TM5 dough preparation unattended and recommends reducing quantities if overloading occurs. The TM31 manual also warns that dough preparation can cause the machine to move because of imbalance.
The Reliable Basic Method: Step by Step
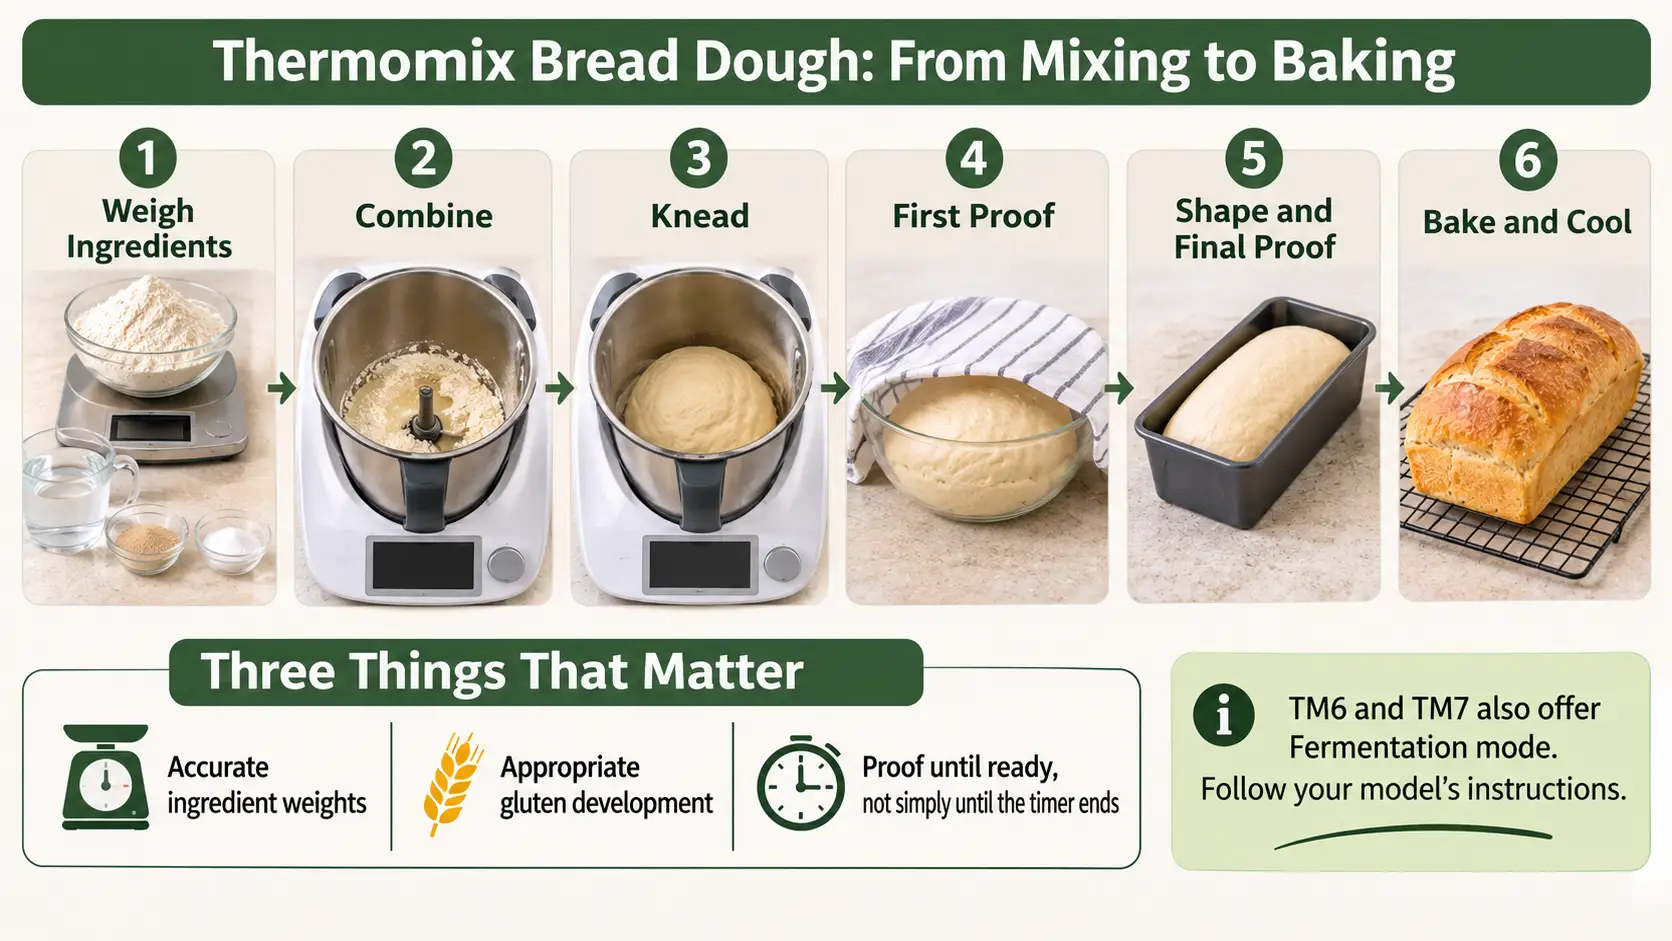
A reliable Thermomix bread dough process follows a consistent sequence: prepare the ingredients, combine them, knead, assess gluten development, prove, shape and bake.
The method below is a practical framework for a basic yeast dough. Exact machine settings and baking instructions should come from a complete recipe tested with the relevant model.
Time, Yield and Equipment
| Item | Guidance |
| Ingredient preparation | Approximately 10–15 minutes as a planning allowance |
| Kneading | Follow the relevant Thermomix model and recipe |
| First proving | Commonly around 1–2 hours, depending on conditions |
| Final proving | Until the shaped dough passes the appropriate readiness checks |
| Baking | Follow the tested loaf recipe for its pan, size and oven |
| Total time | Several hours, including fermentation and baking |
| Yield | Depends on final dough weight and loaf shape |
| Equipment | Thermomix, digital scales, proving container, dough scraper, loaf tin or baking tray and oven |
These are planning guidelines rather than Kitchen Memo test timings. Temperature, hydration, yeast quantity and flour type can substantially change the elapsed time.
Step-by-Step Instructions
Step 1: Weigh the ingredients
Measure flour, water, yeast and salt accurately.
Use the Thermomix scale rather than estimating flour by volume. Small measurement differences can noticeably change dough hydration.
Step 2: Prepare the liquid
When the selected recipe calls for warm water, use a suitable gentle temperature. Approximately 37°C can be used as a recipe setting, but there is no need to warm every bread liquid to exactly this temperature.
Avoid excessively hot water.
Step 3: Combine the ingredients
Add ingredients in the specified order.
For a liquid-first recipe, start with the liquid and yeast, followed by flour and salt. Allow the ingredients to combine into a rough dough before starting the kneading stage.
Step 4: Knead using Dough mode
Select the machine’s dedicated Dough or Knead function.
Follow the time prescribed for your model and recipe. Do not assume that a TM6 kneading duration automatically transfers to a TM31 or TM5.
The dough should become more cohesive and elastic as its gluten structure develops.
Step 5: Check the dough
Take a small piece and gently stretch it.
A well-developed white bread dough should stretch rather than immediately tearing. Some formulas require less development during the machine stage because they rely on longer fermentation.
Step 6: Complete the first proof
Transfer the dough to a suitable covered, lightly oiled container.
Allow it to expand until it has reached the size and texture required by the recipe. A common visual reference is approximately doubled volume, although not every bread formula needs to double.
TM6 and TM7 users can also follow compatible Cookidoo Fermentation guidance for proofing in the Varoma. This is a model-specific alternative, not a mandatory step.
Step 7: Shape the dough
Turn the dough onto a lightly prepared work surface.
Gently remove excessive large air pockets and shape it into the required loaf form. Avoid adding large amounts of flour during shaping.
Step 8: Complete the final proof
Transfer the shaped dough to the appropriate baking tin or tray.
Cover it to prevent the surface from drying out. Allow it to expand until it passes the final proving checks.
Step 9: Bake the bread
Bake using a tested oven temperature and duration appropriate to the formula, loaf size and pan.
Do not assume that every Thermomix bread dough can use the same baking temperature or timing.
Step 10: Cool before slicing
Remove the baked loaf from its tin when appropriate and cool it on a rack.
Allow the internal crumb to settle before slicing. Cutting very hot bread can compress its structure and make it appear gummy.
Model Differences and Bowl Capacity
Although Thermomix models share the broad purpose of mixing and kneading, their controls and operating instructions are not identical.
| Model | Dough function | Capacity and operating considerations |
| TM31 | Select the speed selector position and Dough mode button; it uses alternating operation | The manual specifies a 2-litre maximum bowl capacity. It does not establish a universal maximum bread-dough weight. |
| TM5 | Select the ear-of-wheat Dough mode and start using the dial | Vorwerk recommends using published recipe quantities, reducing a batch if overloaded and supervising experimental preparations. |
| TM6 | Dedicated Dough mode with alternating blade movements and pauses | Cookidoo provides a maximum dough-mode quantity of 1 kg. Use the applicable recipe instructions. |
| TM7 | Select Dough mode from the modes screen | Dough mode is unavailable when the bowl temperature is 60°C or higher. Follow the TM7 manual for batch limits. |
A bowl’s liquid capacity is not the same thing as its safe dough capacity. Do not calculate a maximum flour quantity simply by looking at the bowl’s volume.
For model-specific operating instructions, consult the TM31 manual, official TM5 Dough mode guidance, TM6 Dough mode guidance and TM7 functionality guidance.
Getting It Right Every Time: Checks, Scaling and Storage
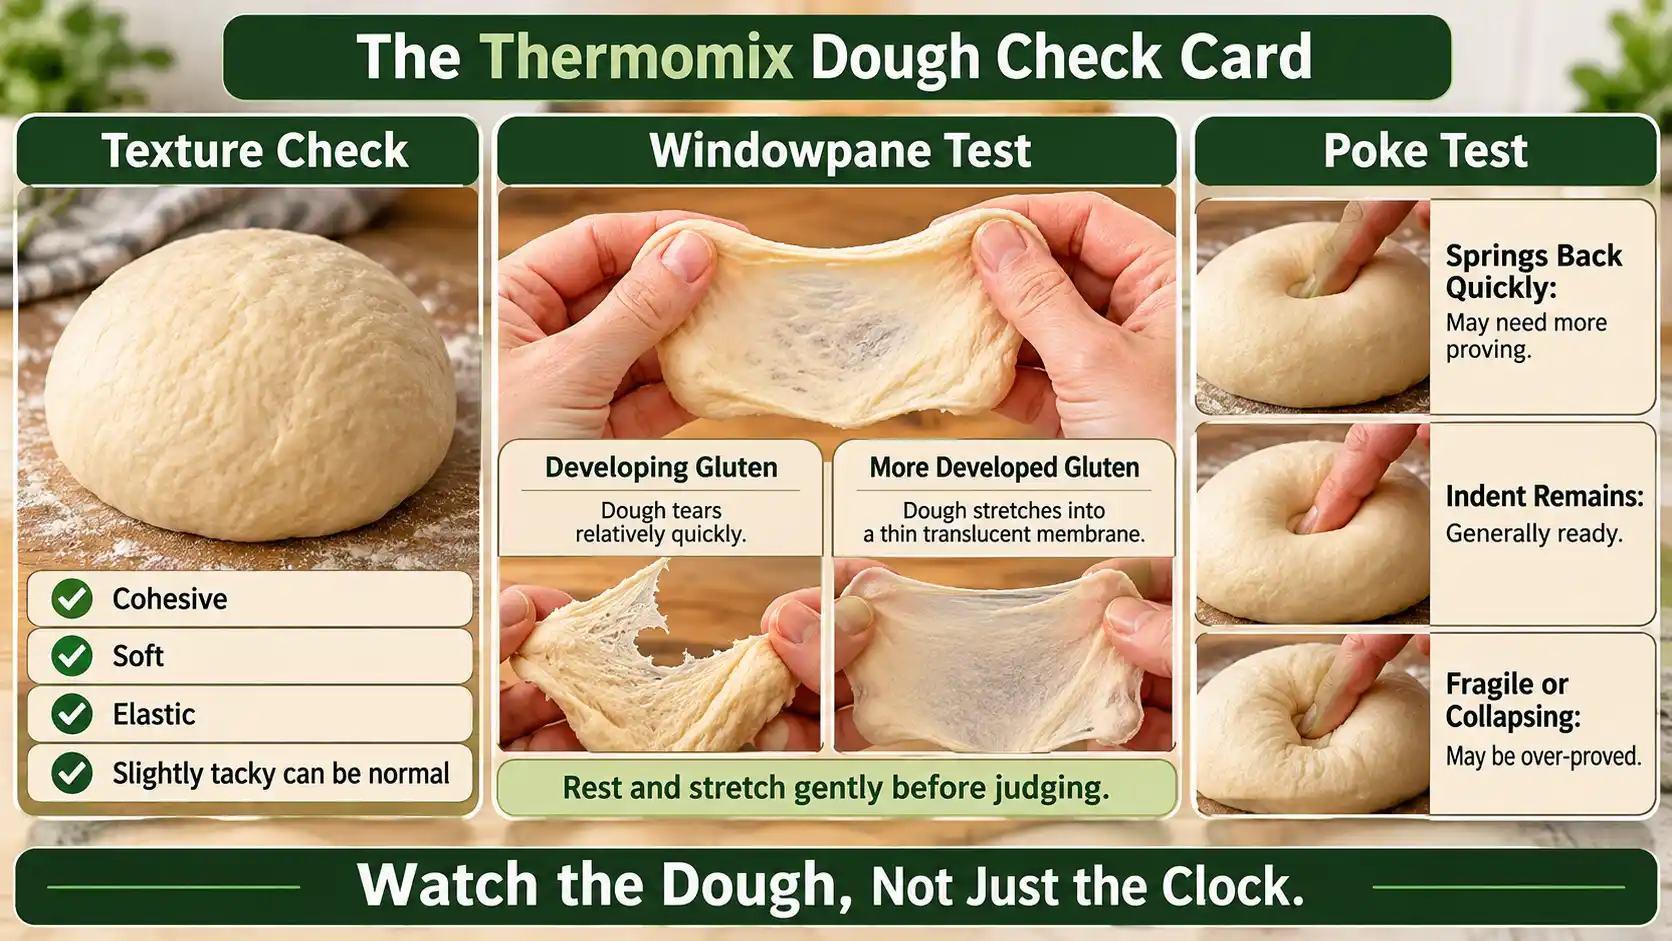
Good bread depends on understanding how the dough changes rather than following a timer without checking the result.
Dough Readiness Checks
| Check | What you see or feel | What it means |
| Texture | Soft, cohesive and elastic | The dough has suitable structure |
| Windowpane test | A small piece stretches into a thin membrane before tearing | Gluten has developed |
| First proof | The dough has expanded considerably | Fermentation has progressed |
| Poke test | A lightly pressed indentation remains rather than immediately springing back | The final proof is approaching readiness |
Windowpane test: Take a small piece of dough and gently stretch it between your fingers. A sufficiently developed white bread dough can stretch thinly enough for light to show through before tearing.
The test is a guide, not an absolute pass-or-fail rule. Long-fermented dough can continue developing strength during its rest.
King Arthur Baking explains this distinction in its windowpane test guide.
Poke test: Lightly flour your finger and gently press the shaped dough. If the indentation springs back quickly, it usually needs more proving. If the indentation remains, it is generally ready to bake. Dough that feels fragile or collapses may be over-proved.
See King Arthur Baking’s guide to knowing when dough has risen enough.
Printable Dough Check Card
| Checkpoint | What to look for |
| Before kneading | Correct ingredient weights |
| After kneading | Cohesive and elastic dough |
| Windowpane | Thin stretch without immediate tearing |
| First proof | Noticeable expansion |
| After shaping | Smooth, appropriately formed loaf |
| Final proof | Suitable expansion and poke-test response |
| Before baking | Oven and pan prepared according to the recipe |
Kitchen Conditions Matter
The time required to prove bread is affected by:
- Temperature: Warmer surroundings generally accelerate yeast fermentation.
- Humidity: Dry conditions can form a dry skin over exposed dough, while humid conditions help prevent excessive surface drying.
- Altitude: Lower atmospheric pressure can change dough expansion and fermentation behavior.
- Flour: Wholemeal, spelt and different wheat flours can absorb water and develop structure differently.
Do not apply a fixed proving time to every kitchen. Start checking the dough before the expected end of the recipe’s proving window.
Scaling and Substitutions
- Scaling up: Do not automatically double the flour and water quantities inside the Thermomix. Check the model’s dough limits and prepare separate batches when needed.
- Scaling down: Preserve the formula’s proportions and use sufficiently accurate weighing.
- Wholemeal flour: It usually requires adjustments to hydration and fermentation compared with refined white flour.
- Spelt flour: Its gluten behaves differently, so avoid automatically transferring standard wheat kneading times.
- Fresh versus dried yeast: Use the equivalent amount specified by the yeast manufacturer or a recipe designed for that yeast type.
For another example of enriched dough, Kitchen Memo’s Hot Cross Bun recipe demonstrates how eggs, butter, milk and sugar change the composition of a basic yeast dough.
Storage and Make-Ahead
Refrigerating unbaked dough
A covered dough can be refrigerated for a slower fermentation when the formula supports cold proving.
Both the first rise and the final rise can be adapted for refrigeration, depending on the recipe. Check its development before baking because cold dough may need additional time to finish expanding.
Freezing shaped dough
Dough can be frozen in suitable portions, but freezing can weaken yeast activity and reduce the rise achieved after thawing.
For better results, wrap portions securely, label them and thaw under refrigerated conditions before allowing the dough to complete its proving process.
Freezing is not always as reliable as baking the dough fresh. King Arthur Baking discusses these limitations in its guide to refrigerating bread dough.
Storing baked bread
Once completely cooled, store bread in a suitable bread bag or container at room temperature. Freeze sliced portions when you need longer storage.
Food safety
Do not taste uncooked bread dough. Raw flour can contain harmful bacteria, and the CDC advises cooking dough thoroughly and washing hands, bowls, utensils and work surfaces after handling raw flour.
Read the CDC’s raw flour and dough safety guidance.
Discard dough if it develops visible mould, unusual discoloration or signs of contamination.
Beyond the Basic Loaf: Artisan and Portuguese-Style Variations
The basic Thermomix bread dough method can be adapted to many bread styles, but the ingredient ratios and handling requirements change.
| Bread style | Main characteristics | What changes |
| Basic sandwich bread | Soft crumb and loaf-pan shape | Moderate hydration and straightforward shaping |
| Artisan-style bread | Often a chewier crust and more open crumb | Frequently different hydration, fermentation and shaping techniques |
| Portuguese-style bread | Varies with the particular regional bread | Recipe-specific flour, hydration, fermentation and shaping |
Artisan bread often benefits from longer fermentation and techniques that preserve the dough’s gas structure.
Portuguese breads also vary considerably. For example, Cookidoo includes Portuguese Bread (Pão de água) among its bread recipes. It should be treated as a dedicated recipe rather than assuming the basic sandwich-loaf formula will produce the same result.
For other bread applications, explore Kitchen Memo’s Cheese and Spinach Rolls and Provolone Pizza.
The foundational principles remain similar: understand hydration, develop the dough appropriately, control fermentation and match shaping and baking to the intended bread.
Conclusion
Reliable Thermomix bread dough basics come down to three things: accurate ingredient ratios, appropriate kneading and judging fermentation by the dough rather than the clock. The machine makes mixing and kneading convenient, but good bread still depends on understanding gluten development, hydration, proving and baking. Once you understand these stages, you can diagnose sticky, dense or flat dough instead of simply repeating a recipe and hoping for a different result.
Frequently Asked Questions
1. How long should I knead bread dough in the Thermomix?
Follow the kneading duration specified for your model and recipe. Cookidoo explains that two minutes of TM6 Dough mode is equivalent to approximately ten minutes of hand kneading. Check gluten development rather than assuming the same duration works for every machine.
2. Do I have to warm the water to 37°C?
No. Approximately 37°C is a useful gentle-warming setting in some recipes, but yeast can work with cooler water too. Avoid excessively hot liquid that can damage the yeast.
3. Why is my Thermomix dough so sticky?
It may have relatively high hydration, the flour may absorb less water, or the dough may need more time to hydrate. Rest it before adding flour, then reassess its consistency.
4. How much flour can the Thermomix handle?
There is no single verified maximum applying to every model. TM6 guidance gives a 1 kg dough-mode maximum, while other models have their own operating instructions and recipe limits. Always check your machine’s manual.
5. Can I make bread in a Thermomix without a bread machine?
Yes. The Thermomix can mix and knead the dough. You can prove it using an appropriate separate setup or compatible Fermentation mode, then shape and bake it in an oven.
6. How do I know my dough has proved enough?
Look for appropriate expansion and use the poke test. Dough that springs back immediately usually needs more time, while dough that retains the indentation is generally ready for baking.
7. Can I make Thermomix bread dough ahead or freeze it?
Yes. Refrigeration can slow fermentation and help with make-ahead preparation. Dough can also be frozen, although its yeast activity and rising performance may change. Follow a recipe designed for the storage method.